Coordinate Measuring Machine Probes
A Coordinate Measuring Machine is defined by the ability of its probe. As with CMMs, there are several types of probes available. There is the contact probe, which measures the workpieces by making contact with them. The non-contact probe that employs lasers or machine vision probes which scan with optical sensors.
Contact probes are a more accurate way of measuring. However, the laser or machine vision probes are far quicker to use, while still holding a high degree of accuracy.
There are also multi-sensor probes which combine both touch and optical scanning, giving the benefit of both types in one probe.

Coordinate Measuring Machines: Contact Probes
The two most common contact probes are Touch Trigger Probes and Analog Scanning Probes.
Touch Trigger Probes:
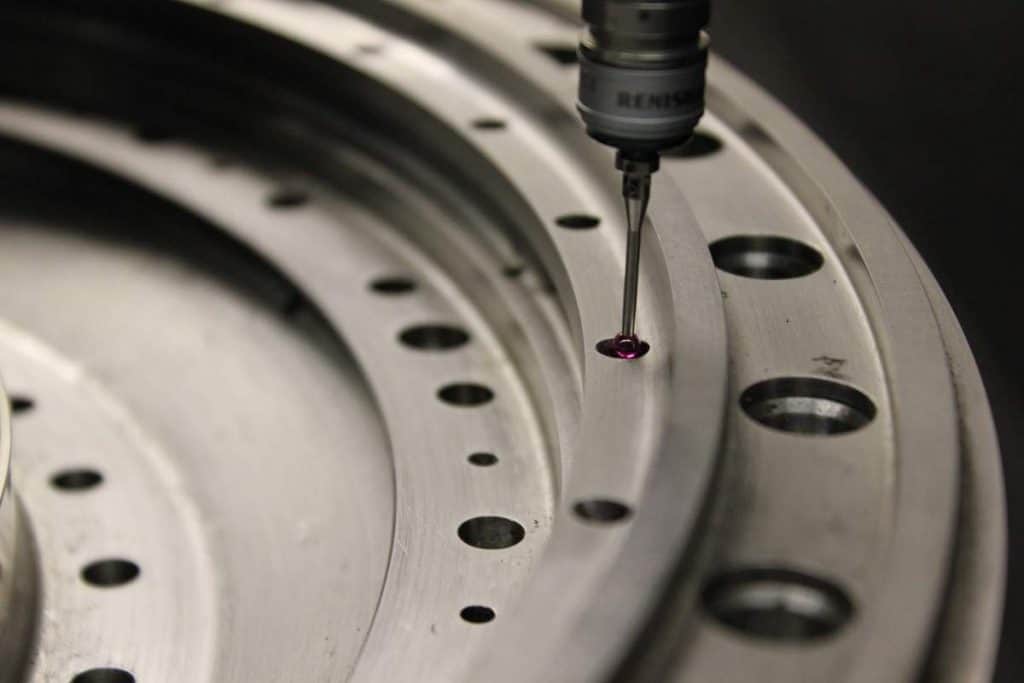
A touch trigger probe has a stylus that is attached to a bearing plate. This is then connected to pressure sensors inside the housing of the probe. Each time the probe makes contact with the workpiece, it generates an electrical signal. The signal is sent back to the CMM to create accurate measurements.
Renishaw, (https://www.renishaw.com/en/renishaw-enhancing-efficiency-in-manufacturing-and-healthcare–1030) invented the first touch trigger probe. Founder, Sir David McMurtry, invented the probe to solve a specific inspection requirement for the Olympus engines that Concorde used.
With a touch trigger probe, the head is mounted at the end of one of the CMM’s moving axes. The probe can be rotated either manually or automatically and can accommodate a variety of attachments and stylus tips.
The advantage of touch probes is that they are versatile and flexible. By incorporating the piezo-based sensors, the effect of stylus bending was eliminated, while the strain gauge technology advancements have ensured that the probes trigger with constant force regardless off the angle of contact it has with the workpiece. These two things combined eliminate directional sensitivity which has given these probes a sub-micron level of accuracy.
Analog Scanning Probes
Analogue scanning probes are another type of stylus-based probes that are used for measuring contoured surfaces such as sheet metal assemblies. Unlike digital probes, which touch individual points, the analogue probe keeps continual contact with the workpiece taking measurements as it is dragged across it.
The continual contact which yields analogue measurements offers dramatically increased levels of data acquisition. The structure of the continuous analogue scanning (CAS) probes is based on continuous data acquisition rather than the point to point of a digital probe.
Analogue scanning probes are extremely useful for collecting the measurement data for complex contoured shapes such as turbine engine blades, cams, automobile bodies, crankshafts and prosthetics. One of these analogue scanning probes is the Renishaw SP600. You can find the Renishaw scanning probes in our Coordinate Measuring Machines here at Eley Metrology.
There are two types of continuous analogue scanning, CAS, systems:
1. Closed-Loop Systems: This probe automatically detects changes in the surface and direction of the workpiece and adjusts itself accordingly to ensure that it maintains contact at all times. The closed-loop system is particularly useful for digitising unknown and complex shapes.
2. Open-Loop Systems: This probe gets driven along a specific path using dimensional information obtained from a data file. The open-loop system is particularly useful for high-speed data gathering on parts with geometry that has been well defined by surface points and vectors or by CAD data.
Analogue probes can acquire up to fifty times more data than touch trigger probes in the same amount of time. The more data that is collected, the more confidence in its accuracy. If there are large gaps between data points the accuracy of the data may not be so assured.
Another advantage of analogue scanning probes over digital probes is their ability to also be used as a touch trigger probe which gives its users more flexibility. An operator will be able to choose which features require a quick touch and which need more time devoted to them. A critical feature that is particularly complex would require continual contact.
Coordinate Measuring Machines: Non-Contact Probes
A non-contact probe is essential for any workpiece that is likely to become deformed under the pressure of a contact probe. They are also useful for more complex, smaller and high-precision workpieces. A non-contact probe is either laser-based or vision-based.
Laser Probes
A laser probe works in a similar way to the touch trigger probe. Instead of using a stylus, it uses a concentrated beam of light to take readings. The beam of light acts as an optical switch. When the beam is projected onto the part, the position will then be read by triangulation through a lens inside the probe receptor.
This technique is similar to the one used by surveyors when they want to find a position or location with bearings from a known distance between two fixed points.
Vision-Based Probes
Microprocessors and other very small parts require the use of vision-based probes. Rather than measuring the parts themselves, a mould is electronically digitised that will generate accurate dimensions for future workpieces.
The Renishaw REVO vision measurement probe is a high-definition camera that is capable of generating multiple measurement points in one frame. This allows the features to be measured and compared to the electronic model by counting the pixels. A vision system lens only requires calibration once which is a huge advantage as other probes require recalibration more often.
The key advantage of a non-contact probe is that it enables the user to collect data from a larger surface area in less time than is possible with contact probes. However, the downside is that the accuracy of the readings is not as great as the contact probes. If you want speed over accuracy, then a non-contact probe is ideal. If you have a particularly complex essential part, you would be better suited to using a contact probe


Comments